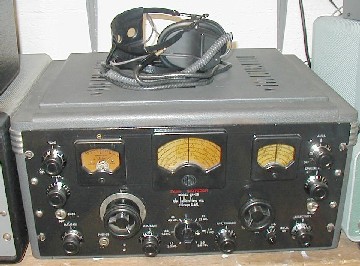
Hallicrafters SX-28A Rebuild


Bought this on ebay early 2004. Here's what it looked like when I originally got it. These are the pics right off of ebay and this is what it looked like when I received it. It had no case, I bought that separately in a later auction.


Yes, as is my compulsion I completely took it apart down to a bare chassis. Remaining parts showing, tube sockets, transformer, sides, etc were all removed. Everything was cleaned and shined up and reassembly started.

I started assembly by installing all I could around the RF section before the RF modules were installed. It made from much easier installation of the components without being cramped by the walls of the RF section. You may notice that the Bass transformer is not original. It didn't work to well either. I did end up finding an original replacement and the Bass In/Out does work correctly now.

Osc section rebuilt and going in.


Mixer section, rebuilt and ready to go in.

Couple of shots with the Osc, Mixer, and RF amp sections installed. Ant input section rebuilt and ready for installation show in the foreground of the right picture.


All the RF section modules and walls are in. Note, I added feed thru caps for the lines going in and out of the RF section. I did do this for all lines running in and out of the RF section.

With the under chassis work done, I started kind of piecing together the parts to see what work was next. At this point I had not done anything with the Gear train, front panel, and side walls yet.

At this point I have the front panel stripped and was starting to rig up the panel wiring. I was using the front panel to guide me in bunching and routing wires.


Just a few more shots of the completed chassis waiting for front panel and gear train. You may notice an extra BNC connector under the S-Mtr set on the left side back, third picture. This is for connection to a panadapter.

Gear Train was next. Yes I did completely disassemble it, that is my compulsion. Had gears, springs, ball bearings all over the place.

Reassembly of the gear train. I used Doug Moore's (KB9TMY) documented procedure for Gear Train Rebuild. What a fantastic document Doug put together. It has completely cured me of fear of gear trains.

Here is the completed gear box mounted to the chassis. Is it nice! It's a beautiful thing band cruising the bands with this gear box. Smooth as velvet. Now I understand the need for a dial lock. You accidentally just touch the knob and it moves off frequency.

Couple more shots with the completed gear train and newly painted side panels installed. You have probably noted the busted band change knob. I did end up getting a good replacement.


Here it is, finished. Completed in about June of 2004. As you can see I painted the front panel black. Probably sacrilegious as I'm sure it's not original color but I really like it. I have no dial lock, the one that came with it was broke, still on the hunt for a replacement. Also, AVC knob is not original, wasn't original when I got it. I did put a knob I had laying around on it and I really kind of like it so I have not really pursued a replacement. Cabinet was a latter addition. It was in beautiful shape when I received it so I didn't do anything to the cabinet. Phones on top are Asto 600 ohm phones. They work very well. All in all I love this receiver. It has fantastic sound from the PM-23 speaker I use with it. Cruising the bands is a real joy with the smooth gear train. It has great sensitivity with the exception of the last band. But I believe not so good operation on that higher band has been a characteristic of the earlier Hallicrafters receivers. I took a lot of pictures and could write a ton of stuff about the particulars of this rebuild. However, it is time consuming doing the web work and that means time away from the bench working on radios. Think I'll keep it short.


Top Of Projects Page


Home